Recognising Face Using Transfer Learning

I’ve created a a Face recognition model using Transfer Learning with VGG. What is VGG? It usually refers to a deep convolution neural network for object recognition developed and trained by Oxford’s renowned Visual Geometry Group (VGG), which achieved very good performance on the ImageNet dataset.
What is Transfer Learning?
Transfer learning is a method of reusing a pre-trained model knowledge for another similar task.
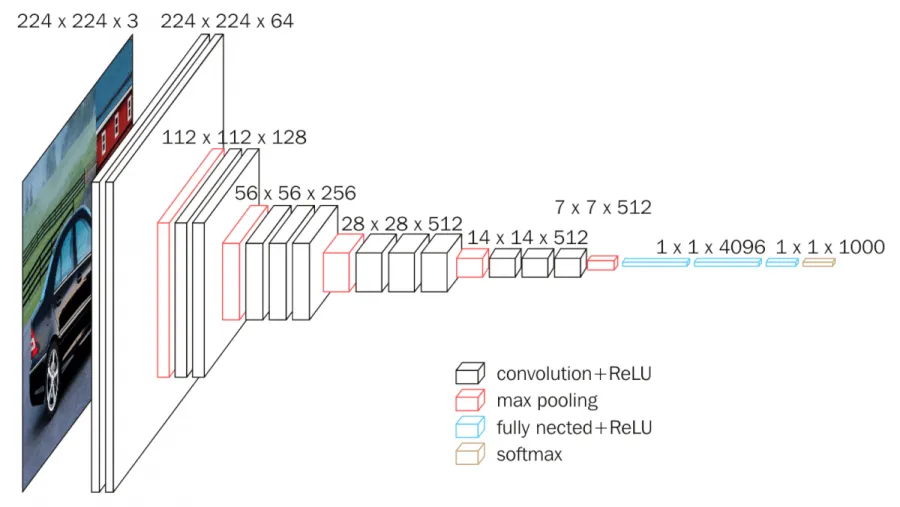
VGG Architecture
The input to cov1 layer is of fixed size 224 x 224 RGB image. The image is passed through a stack of convolutional (conv.) layers, where the filters were used with a very small receptive field: 3×3 (which is the smallest size to capture the notion of left/right, up/down, center). In one of the configurations, it also utilizes 1×1 convolution filters, which can be seen as a linear transformation of the input channels (followed by non-linearity). The convolution stride is fixed to 1 pixel; the spatial padding of conv. layer input is such that the spatial resolution is preserved after convolution, i.e. the padding is 1-pixel for 3×3 conv. layers. Spatial pooling is carried out by five max-pooling layers, which follow some of the conv. layers (not all the conv. layers are followed by max-pooling). Max-pooling is performed over a 2×2 pixel window, with stride 2.
Three Fully-Connected (FC) layers follow a stack of convolutional layers (which has a different depth in different architectures): the first two have 4096 channels each, the third performs 1000-way ILSVRC classification and thus contains 1000 channels (one for each class). The final layer is the soft-max layer. The configuration of the fully connected layers is the same in all networks.
All hidden layers are equipped with the rectification (ReLU) non-linearity. It is also noted that none of the networks (except for one) contain Local Response Normalisation (LRN), such normalization does not improve the performance on the ILSVRC dataset, but leads to increased memory consumption and computation time.
Lets start writing the code..
My VGG model :
from __future__ import print_function
import keras
from keras.preprocessing.image import ImageDataGenerator
from keras.models import Sequential
from keras.layers import Dense, Input, Flatten
from keras.applications.vgg16 import preprocess_input
from keras.applications.vgg16 import VGG16
from keras.models import Model
import numpy as np
from glob import globIMAGE_SIZE =[224,224] #because vgg takes this size image as an input #location where my images aretrain_path = 'C:\\Users\\91811\\Desktop\\MLOps\\Datasets\\Train'
test_path = 'C:\\Users\\91811\\Desktop\\MLOps\\Datasets\\Test'
These are the some libraries which we might require for our model training.
#getting images from imagenet 3 means here 3d images (coloured images) vgg = VGG16(input_shape=IMAGE_SIZE + [3] , weights = 'imagenet' , include_top = False)for layer in vgg.layers:    #freezing layers
    layer.trainable = Falsefolder =glob('C:\\Users\\91811\\Desktop\\MLOps\\Datasets\\Train\\*')x = Flatten()(vgg.output)
prediction = Dense(len(folder), activation='softmax')(x) model = Model(inputs=vgg.input , output=prediction)model.summary() #Complete layer summarymodel.compile(loss = 'categorical_crossentropy' , optimizer = 'adam' , metrics=['accuracy'])train_datagen = ImageDataGenerator(rescale = 1./255 , shear_range=0.2, zoom_range=0.2 , horizontal_flip=True)training_Set = train_datagen.flow_from_directory('C:\\Users\\91811\\Desktop\\MLOps\\Datasets\\Train',target_size=(224,224),batch_size=32 , class_mode='categorical')test_datagen = ImageDataGenerator(rescale = 1./255)test_set =  test_datagen.flow_from_directory('C:\\Users\\91811\\Desktop\\MLOps\\Datasets\\Test',target_size=(224,224),batch_size=32 , class_mode='categorical', shuffle=False)r = model.fit_generator(training_Set,validation_data=test_set,epochs=5,steps_per_epoch=len(training_Set), validation_steps=len(test_set))from keras.models import load_modelmodel.save('vggtl.h5') #saving our model
I’ve created my own dataset by clicking around 200 images of me.

Using OpenCV , Recognisation of face :
These are the libraries I used
from PIL import Image
from keras.applications.vgg16 import preprocess_input
import base64
import json
import cv2
import random
from io import BytesIO
from keras.models import load_model
import numpy as np
from keras.preprocessing import image
Here I’ve used haarcascade frontal face. Haar Cascade is a machine learning object detection algorithm used to identify objects in an image or video.
model = load_model("vggtl.h5") #loading our vgg model face_cascade = cv2.CascadeClassifier("haarcascade_frontalface_default.xml")def face_extractor(img):
    faces = face_cascade.detectMultiScale(img,1.3,5)
    if faces is ():
        return None
    for (x,y,w,h) in faces:
        cv2.rectangle(img(x,y),(x+w,y+h),(0,255,255),2)
        cropped_face = img[y:y+h, x:x+w]
    return cropped_facevideo_capture = cv2.VideoCapture(0)
while True:
    _,frame = video_capture.read()
    face=face_extractor(frame)
    if type(face) is np.ndarray:
        face = cv2.resize(face, (224,224))
        im = Image.fromarray(face,'RGB')
        img_array =np.array(im)
        img_array = np.expand_dims(img_array,axis=0)
        pred  = model.predict(img_array)
        print(pred)

        name = "None Matching"

        if(pred[0][3]>0.5):
            name='Samkit'
        cv2.putText(frame,name,(50,50),cv2.FONT_HERSHEY_COMPLEX,1,(0,255,0),2)
    else:
        cv2.putText(frame,"No face Found",(50,50),cv2.FONT_HERSHEY_COMPLEX,1,(0,255,0),2)
    cv2.imshow('Video',frame)
    if cv2.waitKey(1) & 0xFF == ord('q'):
        break
video_capture.release()
cv2.destroyAllWindows()
I’ve made a function extractor which takes my cropped image . Now finally with the help of the CV2 , it recognize the face in the live video.

Thanks for reading !